Binding
Pages
Binding your manuscript is more than just putting covers on it. Remember, you’ve been writing on bifolio pages, i.e., large sheets of parchment folded in half to make two pages. To fully understand how the pages are set up, written on, and bound into quires (pages sewn together into a section), watch this video before moving on:
Think about the programs that your school hands out at certain events: awards nights, special student presentations, theater productions. They are usually sheets of regular 8.5×11 paper that are folded in the center and stapled. The first page and the last page are actually printed on the same piece of paper. This is similar to one quire of a medieval manuscript!
Check out the images on this page before reading more.
You can see that each separate quire of bifolio pages are sewn together. Then all of the quires that make up the book are sewn together. Pages were numbered when being written to help ensure that bindings were put together in the right order. Sometimes a catchphrase was written at the bottom of the page for one folio: this word was the same as the first word in the next quire, so the bookbinder could have another helpful guide to make sure he was putting things together appropriately. See an excellent example of this on Book and Byte here.
The material used to bind the pages and quire together could be made from a variety of materials, including thread wrapped around other pieces of stiffened parchment or even threads wrapped around wooden strips.
Cover/Binding
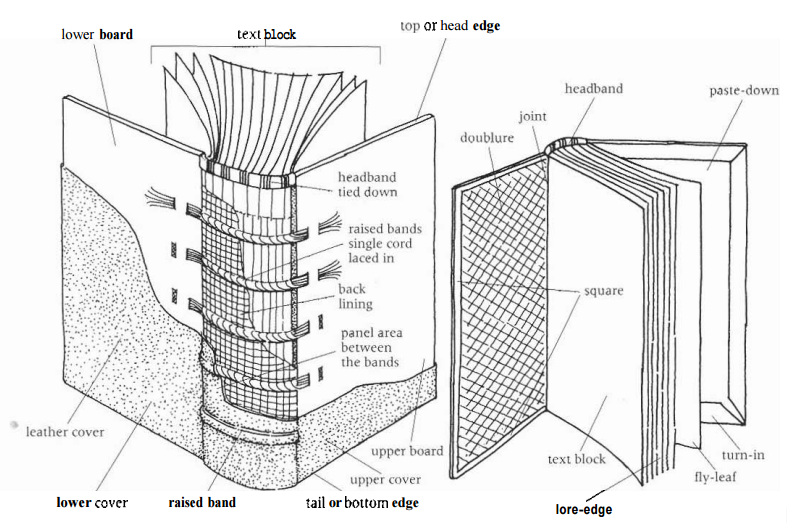
Example showing layers of binding materials (via)
Now carefully watch the video below. You will see the steps involved in making a book, which are surprisingly still very similar to today’s way of making books:
- Create bifolio pages.
- Sew together in quires (notice the frame used to help keep everything straight and to keep things from slipping around).
- A spine is glued/sewn on to give the backing more structure.
- Cover materials are chosen, usually of some kind of wood to give the cover a sturdy nature to be able to keep the pages within safe. These are also glued or sewn on in some manner.
- Now it’s time to choose what your cover will look like. Many chose to overlay leather and/or jewels and decoration to give the books a finer appearance. In the video, they are cutting leather to size to allow it to fit over the cover boards. (The video also shows goldleafing and engraving as a way of decorating. This book also has a cover box that it can slip into. Medieval books sometimes had cover boxes made of wood or leather satchels instead.)
(Here is an additional video of another book being built. This one has a voice-over description of what is happening, and the steps are a bit more detailed.)
Very carefully read over this PDF of the materials used for bookbinding and how everything was used. This has some very useful terminology as well.
- Materials used for covers include leather and woods. These were helpful in keeping the parchment pages inside the bindings from shrinking in the varying moisture levels.
- Take careful note of pages 14-16, as they include interesting pieces of the cover and the correct terms for those specific parts.
- Page 17 gives a quick overview of the tools used to bind books, including the sewing frame we saw in the video above.
- The rest of the PDF deals with different types of book bindings. I only gave a very brief description above, because each bookbinder might have his own preferred method of binding books. As you can see, there are multiple methods and no one method was the “proper” one.
I want to know more
- “Historical Images, Manuscript and Binding” by Yale’s Traveling Scriptorium
- “Cuddly Quires” from Book and Byte (be sure to check out the sidebar links for Bifolium and Quire!)
- “Packing it up” from Book and Byte (again, check out the other binding links on the right sidebar)
- “Medieval Bookbinding” on Antithetical.org
- Database of Bookbindings from the British Library
- Hand Bookbindings from Princeton University Library
- “Materials and Techniques of Manuscript Production: Bookbinding” from the Medieval Manuscript Manual